> ## Documentation Index
> Fetch the complete documentation index at: https://gcore-doc-1894.mintlify.site/llms.txt
> Use this file to discover all available pages before exploring further.
# Custom SSL certificate configuration
A custom SSL certificate must be issued for the [custom domain](/cdn/cdn-resource-options/general/create-and-set-a-custom-domain-for-the-content-delivery-via-cdn) of the CDN resource (`cdn.example.com`). A certificate for `*.example.com` covers one DNS label under that domain (`cdn.example.com`). It does not cover the apex domain `example.com` or a nested hostname `assets.cdn.example.com`. Confirm that every required hostname appears in the certificate's Subject Alternative Name (SAN) extension. Wildcard matching follows [RFC 9525](https://www.rfc-editor.org/rfc/rfc9525).
Upload the certificate in the [Gcore Customer Portal](https://portal.gcore.com), then attach it to an existing CDN resource, because custom SSL is not selected on the resource creation form.
## Upload an SSL certificate
In the Customer Portal, navigate to **CDN** > **SSL certificates**.
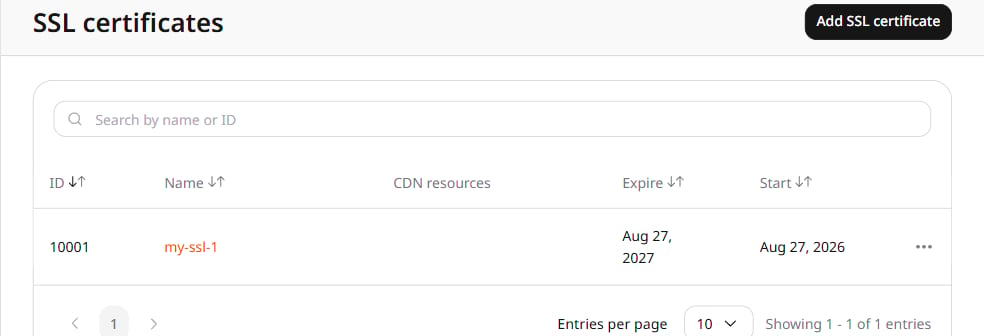 Click **Add SSL certificate**. The **Create SSL Certificate** form opens.
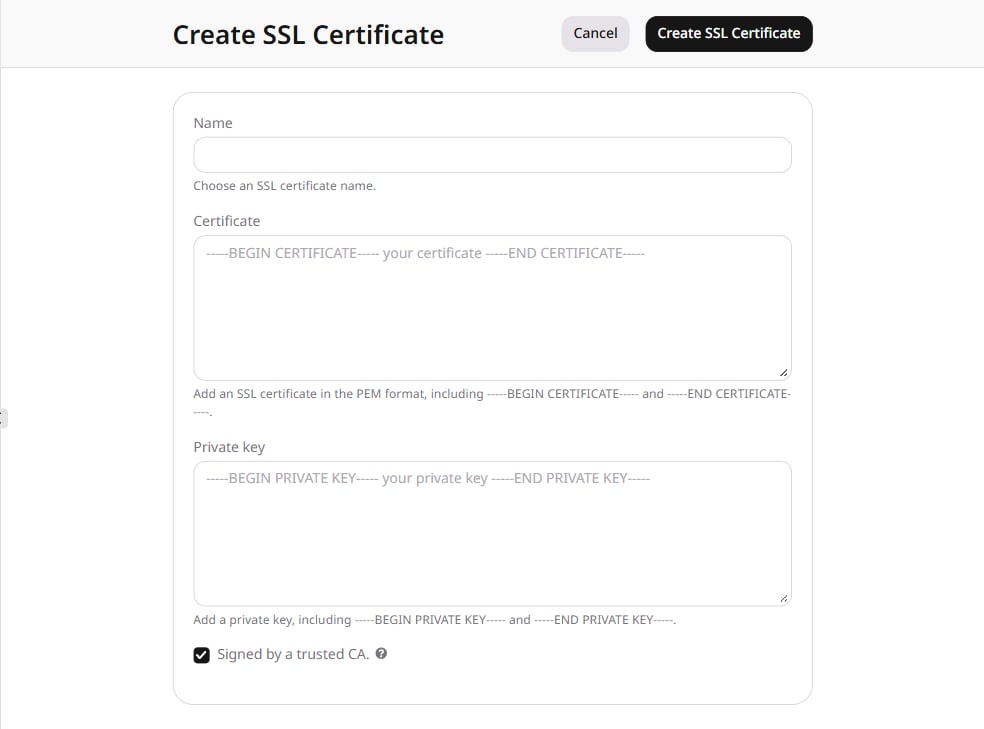 Enter the values from the certificate authority:
* **Name**: a label used only in the Customer Portal.
* **Certificate**: the certificate chain in [PEM](https://en.wikipedia.org/wiki/Privacy-Enhanced_Mail) format (leaf certificate, intermediate CA, root CA).
* **Private key**: the matching private key.
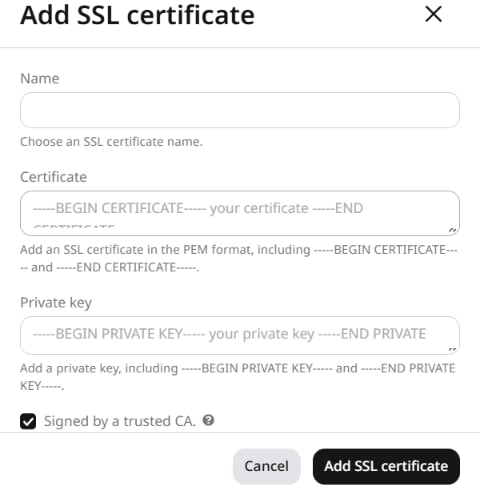
Paste the chain and key as described in [Certificate chain](#certificate-chain-and-key). Leave **Signed by a trusted CA.** checked when the certificate is from a trusted CA. Clear the checkbox when it is not.
Enter the values from the certificate authority:
* **Name**: a label used only in the Customer Portal.
* **Certificate**: the certificate chain in [PEM](https://en.wikipedia.org/wiki/Privacy-Enhanced_Mail) format (leaf certificate, intermediate CA, root CA).
* **Private key**: the matching private key.
Paste the chain and key as described in [Certificate chain](#certificate-chain-and-key). Leave **Signed by a trusted CA.** checked when the certificate is from a trusted CA. Clear the checkbox when it is not.
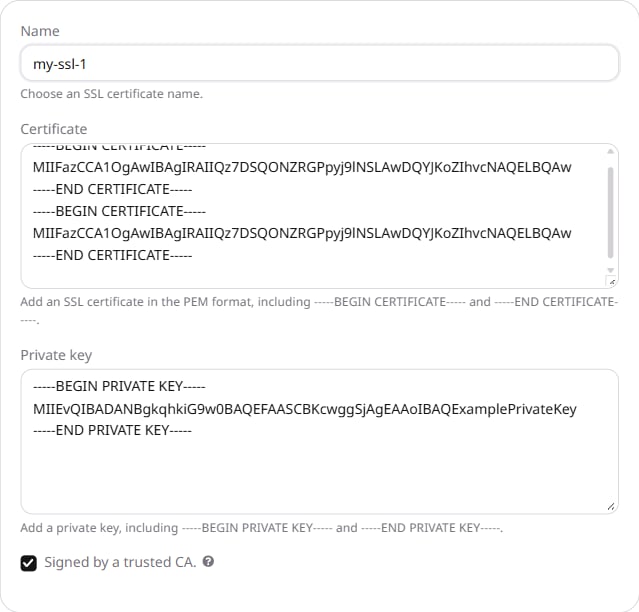 Click **Create SSL Certificate**. The certificate appears in the SSL certificates list.
Attach the certificate to a CDN resource after upload, because an uploaded certificate is not used until it is selected on a resource.
### Certificate chain and key
Open the certificate file in PEM format (`.pem`, `.crt`, or `.cer`) in a text editor.
Copy the chain in this order: leaf certificate, intermediate CA, root CA. Paste the full contents into **Certificate**, including the `-----BEGIN CERTIFICATE-----` and `-----END CERTIFICATE-----` tags. Do not leave blank lines between certificates.
Click **Create SSL Certificate**. The certificate appears in the SSL certificates list.
Attach the certificate to a CDN resource after upload, because an uploaded certificate is not used until it is selected on a resource.
### Certificate chain and key
Open the certificate file in PEM format (`.pem`, `.crt`, or `.cer`) in a text editor.
Copy the chain in this order: leaf certificate, intermediate CA, root CA. Paste the full contents into **Certificate**, including the `-----BEGIN CERTIFICATE-----` and `-----END CERTIFICATE-----` tags. Do not leave blank lines between certificates.
 Add a new line at the end of the chain.
Open the private key file (`.key`) in a text editor. Paste the full contents into **Private key**, and keep the exact `BEGIN` and `END` lines from the key file. Common delimiters include `-----BEGIN PRIVATE KEY-----` and `-----BEGIN RSA PRIVATE KEY-----`.
## SSL certificate on a CDN resource
Create the [CDN resource](/cdn/getting-started/create-a-cdn-resource/create-a-cdn-resource) first. On the create form, enter the hostname in **Add domain**. After the resource exists, attach the custom certificate in the resource SSL settings.
In the Customer Portal, navigate to **CDN** > **CDN resources** and click the resource **CNAME**.
Add a new line at the end of the chain.
Open the private key file (`.key`) in a text editor. Paste the full contents into **Private key**, and keep the exact `BEGIN` and `END` lines from the key file. Common delimiters include `-----BEGIN PRIVATE KEY-----` and `-----BEGIN RSA PRIVATE KEY-----`.
## SSL certificate on a CDN resource
Create the [CDN resource](/cdn/getting-started/create-a-cdn-resource/create-a-cdn-resource) first. On the create form, enter the hostname in **Add domain**. After the resource exists, attach the custom certificate in the resource SSL settings.
In the Customer Portal, navigate to **CDN** > **CDN resources** and click the resource **CNAME**.
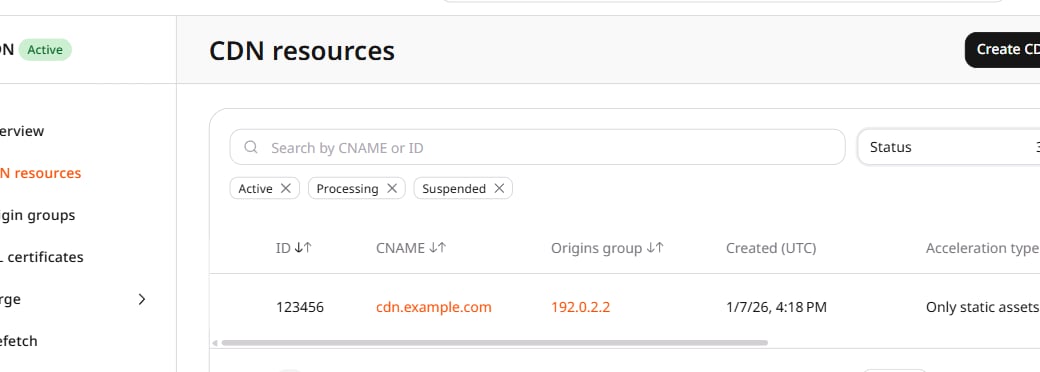 On the **OPTIONS** tab, open **SSL** under **General**.
Turn on **Enable HTTPS** and select **Custom SSL certificate**. If a certificate is already uploaded, select it in the certificate dropdown. If none are uploaded, click **Add SSL certificate**.
On the **OPTIONS** tab, open **SSL** under **General**.
Turn on **Enable HTTPS** and select **Custom SSL certificate**. If a certificate is already uploaded, select it in the certificate dropdown. If none are uploaded, click **Add SSL certificate**.
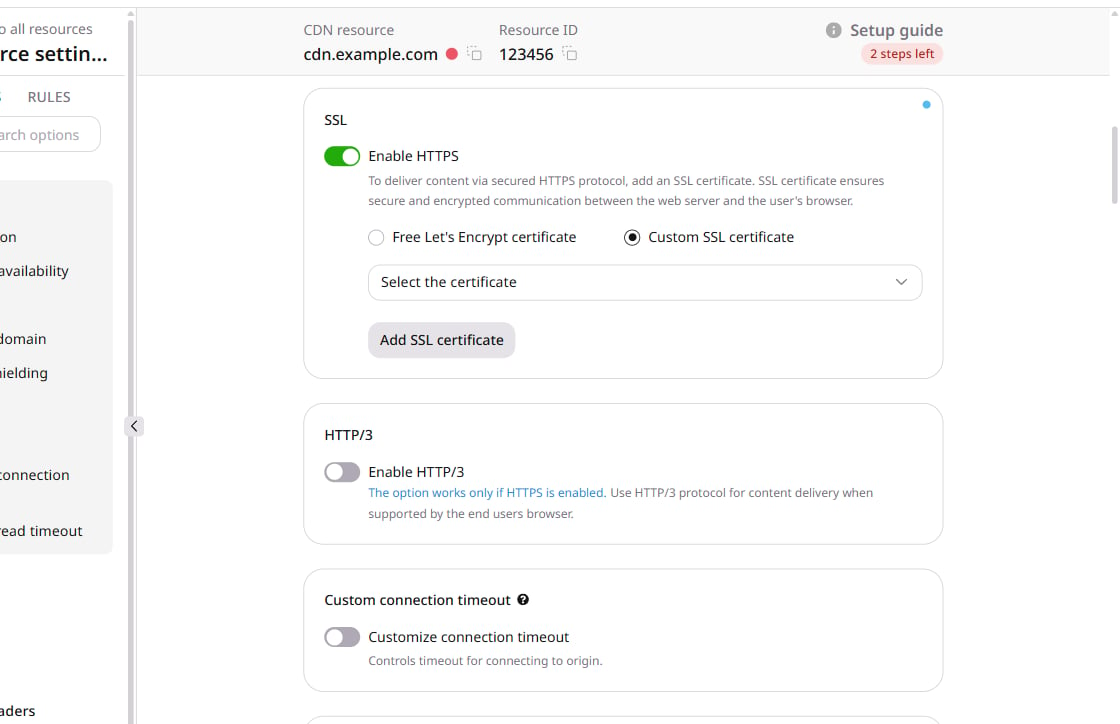 Click **Add SSL certificate**, paste the chain and key in the dialog, then click **Add SSL certificate**. The paste rules match [Certificate chain](#certificate-chain-and-key).
 Click **Save changes**.
## Certificate management
Uploaded certificates are listed under **CDN** > **SSL certificates**. The table shows ID, name, connected CDN resources, start date, and expiration date.
The certificate name can be changed from **Settings** on the certificate row, while the certificate and private key values cannot be edited after upload.
### SSL certificate renewal
Before expiration, upload a replacement certificate and select it on every resource listed under **CDN resources** for the old certificate.
Add the replacement in [SSL certificates](#upload-an-ssl-certificate). Do not delete the old certificate yet.
On the old certificate row, note every resource under **CDN resources**. For each listed resource, open **SSL** settings, select the new certificate, and click **Save changes**.
Wait at least 15 minutes after the last resource is saved.
For each hostname on the connected resources, open the site over HTTPS, click the lock icon, open **Connection is secure**, then **Certificate is valid**. Compare the displayed data with the new certificate.
After every hostname matches the new certificate, [delete](#delete-an-ssl-certificate) the old certificate. Removing it earlier interrupts HTTPS delivery on any resource that still selects it.
### Expiration notifications
Notification emails are sent to the administrator and engineer addresses 14 days before expiration, seven days before expiration, and on the expiration date. A reminder also appears on login during those 14 days and after expiration. **SSL certificates** in the side panel shows an exclamation mark when a certificate is expired or will expire within 14 days.
A red exclamation mark marks an expired certificate, while a yellow warning marks a certificate that expires in 14 days or fewer.
### Delete an SSL certificate
A certificate that is selected on a CDN resource cannot be deleted. Replace it on every connected resource first.
Turning off **Enable HTTPS** stops HTTPS delivery on that resource. To detach a certificate, select a replacement certificate on every connected resource. Turn off **Enable HTTPS** only when HTTPS delivery is being removed.
On the certificate row, note every resource under **CDN resources**. For each listed resource, open **SSL** settings and select a replacement certificate, then click **Save changes**. Turn off **Enable HTTPS** only when HTTPS delivery is being removed from that resource.
Click the three dots next to the certificate, then click **Delete**. The same menu includes **Settings**.
Click **Save changes**.
## Certificate management
Uploaded certificates are listed under **CDN** > **SSL certificates**. The table shows ID, name, connected CDN resources, start date, and expiration date.
The certificate name can be changed from **Settings** on the certificate row, while the certificate and private key values cannot be edited after upload.
### SSL certificate renewal
Before expiration, upload a replacement certificate and select it on every resource listed under **CDN resources** for the old certificate.
Add the replacement in [SSL certificates](#upload-an-ssl-certificate). Do not delete the old certificate yet.
On the old certificate row, note every resource under **CDN resources**. For each listed resource, open **SSL** settings, select the new certificate, and click **Save changes**.
Wait at least 15 minutes after the last resource is saved.
For each hostname on the connected resources, open the site over HTTPS, click the lock icon, open **Connection is secure**, then **Certificate is valid**. Compare the displayed data with the new certificate.
After every hostname matches the new certificate, [delete](#delete-an-ssl-certificate) the old certificate. Removing it earlier interrupts HTTPS delivery on any resource that still selects it.
### Expiration notifications
Notification emails are sent to the administrator and engineer addresses 14 days before expiration, seven days before expiration, and on the expiration date. A reminder also appears on login during those 14 days and after expiration. **SSL certificates** in the side panel shows an exclamation mark when a certificate is expired or will expire within 14 days.
A red exclamation mark marks an expired certificate, while a yellow warning marks a certificate that expires in 14 days or fewer.
### Delete an SSL certificate
A certificate that is selected on a CDN resource cannot be deleted. Replace it on every connected resource first.
Turning off **Enable HTTPS** stops HTTPS delivery on that resource. To detach a certificate, select a replacement certificate on every connected resource. Turn off **Enable HTTPS** only when HTTPS delivery is being removed.
On the certificate row, note every resource under **CDN resources**. For each listed resource, open **SSL** settings and select a replacement certificate, then click **Save changes**. Turn off **Enable HTTPS** only when HTTPS delivery is being removed from that resource.
Click the three dots next to the certificate, then click **Delete**. The same menu includes **Settings**.
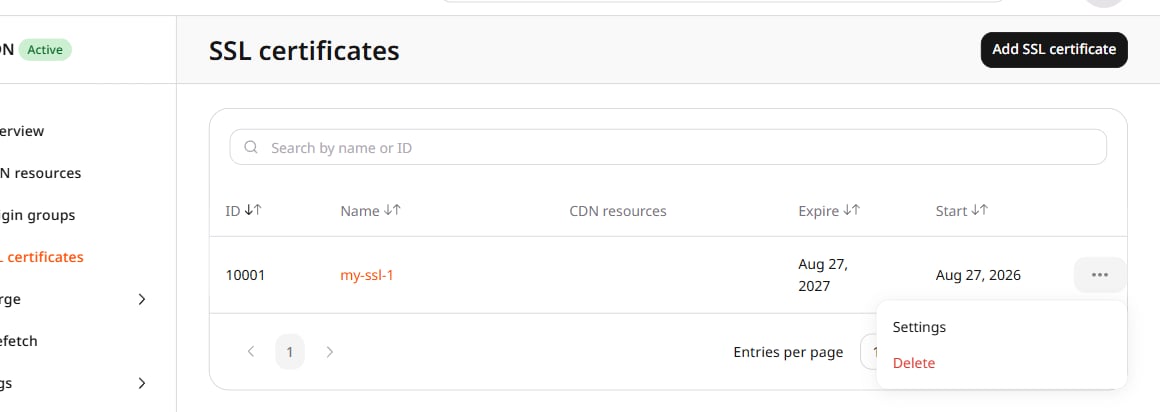 In the confirmation dialog, click **Yes, delete**.