

storage.googleapis.com/bucket-name/object-name.
Access to a Google Cloud project with permission to create buckets and edit bucket IAM policies, an active CDN subscription, and control of the DNS zone for the CDN domain are required.
1
Create a Google Cloud Storage bucket
In the Google Cloud console, navigate to Cloud Storage > Buckets and click Create. Configure the bucket:
- Enter a globally unique bucket name.
- Select the location and storage class for the content.
- Select uniform bucket-level access.
- Configure public access prevention so it is not enforced for this bucket.
- Configure the required data protection settings and click Create.
2
Upload the content
Open the bucket, click Upload files or Upload folder, and upload the assets to deliver through the CDN.
3
Allow public object access
On the bucket page, open Permissions and click Grant access:
-
In New principals, enter
allUsers. - In Select a role, select Storage Object Viewer.
- Click Save, then click Allow public access.
4
Verify the Google Cloud Storage URL
Open a public object through the path-style endpoint:Replace
my-bucket-1/images/image.png with the bucket name and object path. The request must return the object without requiring Google authentication.5
Create the CDN resource
In the Gcore Customer Portal, click Create CDN resource and configure the resource: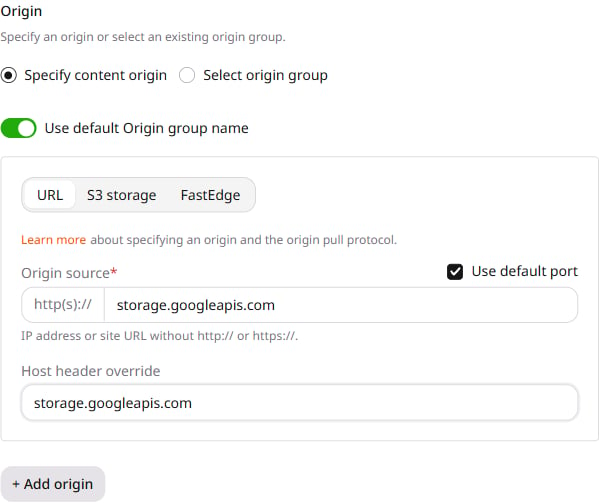
-
In Add domain, enter the CDN domain —
cdn.example.com. - Select Do not delegate to keep DNS at the current provider.
- Under Origin, select Specify content origin and URL.
-
In Origin source, enter
storage.googleapis.com. - Keep Use default port enabled.
-
In Host header override, enter
storage.googleapis.com. - Under SSL, enable Enable HTTPS.
- Select Get free Let’s Encrypt certificate or Custom SSL certificate. A Let’s Encrypt certificate is issued after the custom domain CNAME is in place.
- Click Create.
6
Configure DNS
At the DNS provider, create a CNAME record for
cdn.example.com that points to the generated *.gcdn.co hostname shown by the Customer Portal.Follow the custom domain setup to verify the DNS record and resource activation.7
Verify the CDN object path
Keep the bucket name in the CDN URL when Rewrite is not configured:The path after the CDN domain is forwarded to
storage.googleapis.com, so it must match the bucket name and object path.8
(Optional) Hide the bucket name
To expose Replace
/images/image.png instead of /my-bucket-1/images/image.png, open the resource settings and navigate to Content. Add the Rewrite option and enter:my-bucket-1 with the bucket name. Click Save changes. The public URL becomes https://cdn.example.com/images/image.png, while the origin request uses /my-bucket-1/images/image.png.9
Update asset URLs and verify delivery
Update the website or application to use the CDN URLs. In the browser developer tools:
- Open the Network panel.
- Reload the page.
- Select an asset request.
-
Confirm that the request uses
cdn.example.comand returns a successful response.